Cost Effective Serverless Nuxt.js
There are tons of deployment offerings each with their own difficulties and cost. I’m going to explore a rather unlikely candidate: Serverless (AWS Lambda).
Nothing is Free
First of all, let’s get something out of the way. Nothing is really free, some stuff are certainly cost-effective more than others. Serverless is extremely cost effective but if you are not careful it could cost more than a typical server.
Serverless and FaaS
You probably heard the fuss around the word “serverless” for a while now, which is often described as “cost effective” and “scalable”. FaaS is the other term for it, being “Function as a service”.
If you have no experience with DevOps the term “serverless” sounds weird.
I won’t go into much details about the serverless mechanism. We can think of it as a server that runs one function in response to an event and shuts down immediately.
That may sound horribly in-efficient, but serverless functions aren’t traditional servers. They are more like containers designed for very fast start up.
Traditional IaaS solutions bills you based on the VM resources, and PaaS bills you similarly plus additional fees like load balancing.
On the other hand, serverless (FaaS) bills you on the execution time instead and the number of invocations. The more your code runs the more it costs, and the longer it runs the more it costs.
And because of this model, it is scalable by default. No need to configure load balancers or pay additional costs for it.
As of the time of this writing, The “Serverless framework” is a very popular offering and probably the default option if you want to do some serverless computing.
Serving without a server
To make sure the transition is smooth, you have to think in a “serverless manner”. Because there is no server that means there is no memory, so stuff like in-memory caches or cookies will not work.
Serverless has existed for a long time being an API solution, since JSON responses are easily consumable.
So if you have a function that returns some text as text/html response, and it runs in response to an HTTP event like a get request to some endpoint. That’s basically how servers work!
So remember how the billing is calculated? One problem of using serverless is the invocation count. You have to take into account that each file that’s going to be requested from your server is a single invocation.
Nuxt generates a lot of JS/CSS chunks and files, a lot of them and for a good reason. That is indeed problematic but we could leverage the PWA plugin to reduce the number of assets requested for successive visits, as they are cached on the client side.
Another thing to keep in mind that serverless doesn’t quite fit for extensive upload/download operations. It is meant for building micro-services. So if you have a lot of large static assets, consider uploading them to a CDN like S3 with CloudFront.
What are we building
We are building a Nuxt.js app using the default template and we are deploying it using the serverless framework with AWS lambda and API Gateway.
Our app will be running with HTTPS enabled.
Perquisites
This article assumes you have a working and activated AWS account, make sure you have one.
Some googling might be required to setup some stuff on the AWS console, I will try to cover the main points. Also we could use the awscli, but I opted for using the AWS console UI.
Setting up
In this article we will just deploy a Nuxt.js starter template, and optimize it for serverless.
First let’s create a Nuxt.js starter template:
shnpx create-nuxt-app serverless-nuxtSelect your template options and let it boil for a couple of minutes.
Now let’s install the serverless framework cli:
shyarn global add serverless

# or

npm i -g serverless
After you are done, verify that you can run the serverless and sls commands.
Now that our tools are installed, make sure you create an account on an AWS and verify it. The serverless CLI requires having credentials to be able to deploy our app. To grab them go to your IAM service users page.

Make sure to fill the user name and to tick the Programmatic access checkbox as we want to be able to use this user in our CLI. Move to the next step.
In this screen select attach existing policies and select from policies the Administrator access policy.
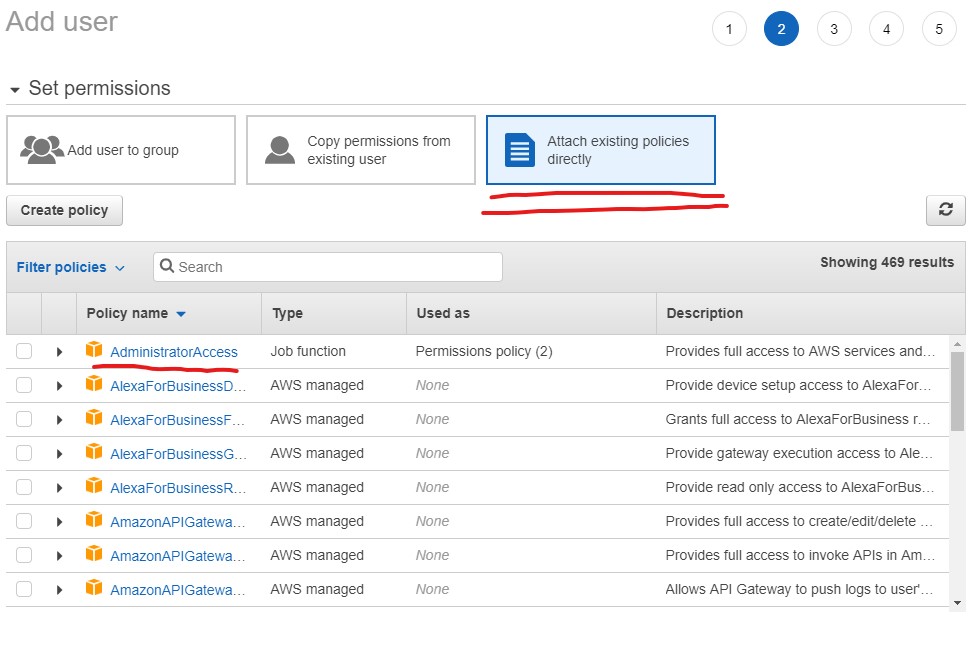
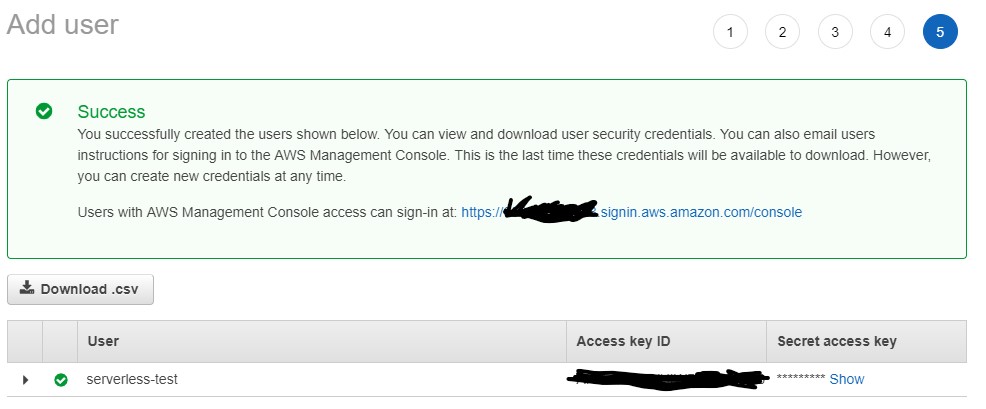
Click through the next steps until you create the user. Then you will get the confirmation along with the security credentials for the user, so keep them somewhere safe.
Now we need to add them to the serverless CLI
shserverless config credentials --provider aws --key AKIAIOSFODNN7EXAMPLE --secret wJalrXUtnFEMI/K7MDENG/bPxRfiCYEXAMPLEKEYIt should display something like:
shServerless: Setting up AWS...Now you should be good to go.
Configuring Nuxt.js for Serverless
To serve static files we need binary files support, which we can do using the serverless-apigw-binary plugin.
For convenience we will also add serverless .
sh# cd into the project
cd serverless-nuxt

# add plugins
yarn add serverless serverless-apigw-binary serverless-offline --dev

# or use npm

npm i -D serverless serverless-apigw-binary serverless-offline
Serverless framework requires having a serverless.yml config file to configure your “service”. So we will create an empty one at the root of our directory:
yaml# serverless.yml

# The service name
service: nuxt-test

# provider information
# we are deploying on aws using the node 10.x runtime.
provider:
  name: aws
  runtime: nodejs10.x

# these are the functions that will run our app.
# typically you need only one for our use-case.
# our function is named app
# the handler is located in lambda.js file exported as "nuxt".
# our function will handle any HTTP requests to any path, you can change that if you want.
functions:
  app:
    handler: lambda.nuxt
    events:
      - http: ANY /
      - http: ANY /{proxy+}

# Add those plugins to our service
plugins:
  - serverless-offline
  - serverless-apigw-binary

custom:
  apigwBinary:
    types:
      - '*/*'
Now our serverless config file is ready, we still need to create the handler which we will need to leverage the Nuxt programmatic API with. But we will need to take some stuff into considerations, and that means more packages to install 🥱, add these and I will explain later what to do with them:
shyarn add fastify fastify-static aws-serverless-express nuxt-start

# or npm

npm i fastify fastify-static aws-serverless-express nuxt-start- First we need to use a Node.js framework to serve requests, I personally like
fastifyas it is a very fast and low overhead framework, which is ideal for serverless web apps. Usingexpressis also fine as both perform very well in our work. - We need
fastify-staticplugin to serve the.nuxt/distfolder. - To further reduce our overhead, we need the
nuxt-startpackage. This package exposes most of the Nuxt programmatic API minus the builder which means its faster than the regularnuxtpackage to start our app. - The serverless function handler requires an adapter to proxy http requests to our server framework, conveniently we can use
aws-serverless-expresspackage to do so.
Now let’s create an server.js file:
jsconst path = require('path');
const awsServerlessExpress = require('aws-serverless-express');
const { Nuxt } = require('nuxt-start');

// Define a list of mime types that we will serve.
// Let's serve everything using a wild card
const binaryTypes = ['*/*'];

// Pass in our custom server function, which uses the aws-serverless-proxy
// to convert our default handler to a serverless compatible one.
const fastify = require('fastify')({
  serverFactory(handler) {
    return awsServerlessExpress.createServer(
      handler,
      null,
      binaryTypes
    );
  },
});

// Serve the `.nuxt/dist` folder using the `/_nuxt` prefix.
fastify.register(require('fastify-static'), {
  root: path.join(__dirname, '.nuxt', 'dist'),
  prefix: '/_nuxt/',
});

/**
 * Creates a fastify server with Nuxt middleware attached.
 **/
exports.createApp = async function start() {
  const config = require('./nuxt.config.js');

  // In the Nuxt programmatic API
  // We need to explicitly set the dev to false.
  const nuxt = new Nuxt(Object.assign(config, { dev: false }));

  // wait for nuxt to be ready.
  await nuxt.ready();
  fastify.use(nuxt.render);

  // wait for fastify to be ready.
  await fastify.ready();

  return fastify;
};
HEADS UP! 🤚
We should not forget to update our nuxt.config.js to use module.exports instead of export default this is because we are importing the config in a pure Node.js context:
js// nuxt.config.js
/* eslint-disable nuxt/no-cjs-in-config */
module.exports = {
  // nuxt config
};
Then check for a buildModules entry, if it contains a @nuxt/eslint-module lets exclude it when running in production:
js{
  buildModules: [
    // Doc: https://github.com/nuxt-community/eslint-module
    process.env.NODE_ENV !== 'production' ? '@nuxtjs/eslint-module' : ''
  ].filter(Boolean)
}}
Now let’s finally create our lambda.js file:
jsconst awsServerlessExpress = require('aws-serverless-express');

// import the server factory function we created.
const { createApp } = require('./server');

// Store a reference to the promise as we don't want to keep creating the server instance.
const appPromise = createApp();

exports.nuxt = async (event, context) => {
  // should return a fastify instance once resolved.
  const app = await appPromise;

  // proxies the request to our underlying fastify server.
  return awsServerlessExpress.proxy(
    app.server,
    event,
    context,
    'PROMISE'
  ).promise;
};
Deploying the app
Now its the fireworks time 🎆
We only need to run the following commands:
shyarn build && sls deployIt should take a few minutes, and it should take less time on subsequent deploys.
You should see the following in the logs:
shServerless: Packaging service...
Serverless: Excluding development dependencies...
Serverless: Creating Stack...
Serverless: Checking Stack create progress...
.....
Serverless: Stack create finished...
Serverless: Uploading CloudFormation file to S3...
Serverless: Uploading artifacts...
Serverless: Uploading service nuxt-test.zip file to S3 (33.26 MB)...
Serverless: Validating template...
Serverless: Updating Stack...
Serverless: Checking Stack update progress...
.................................
Serverless: Stack update finished...
Service Information
service: nuxt-test
stage: dev
region: us-east-1
stack: nuxt-test-dev
resources: 11
api keys:
  None
endpoints:
  ANY - https://random123.execute-api.us-east-1.amazonaws.com/dev
  ANY - https://random123.execute-api.us-east-1.amazonaws.com/dev/{proxy+}
functions:
  nuxt: nuxt-test-dev-app
layers: None
Grab the URL given in the output and visit that link, you will see the nuxt logo doing back flips 🤸. Are we done? NO!
Open the console! You will see that it’s logging a bunch of 404’s 🤦♂️
Fixing Asset URLs with Custom Domains
If you inspect the failing assets, you will notice that its trying to access the https://random123.execute-api.us-east-1.amazonaws.com/ link to locate some assets, our page worked only because of SSR, if you were to move to another page it would fail. This is because our app is hosted on /dev route and not the root route, so any absolute links will fail.
We could fix this by configuring our Nuxt config to use the deployment url as a base url, but that isn’t very robust as the service link is unpredictable. We could give our deployed app a custom domain name and run our service via that URL. You would probably deploy this with a custom domain anyways, right?
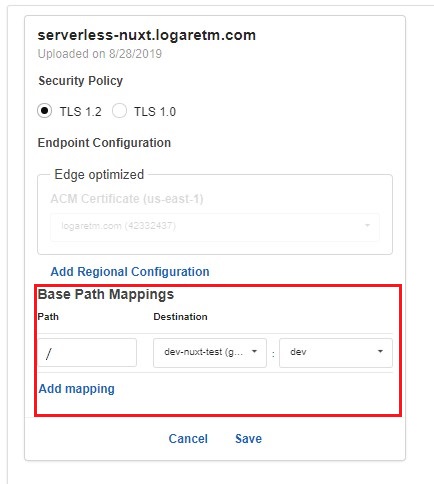
You need to have a SSL certificate for your domain imported in the AWS console, you can go to ACM and import/request a new certificate.

After creating the domain, you should be able to see that its pending creation, it should take about 40 minutes to set everything up.
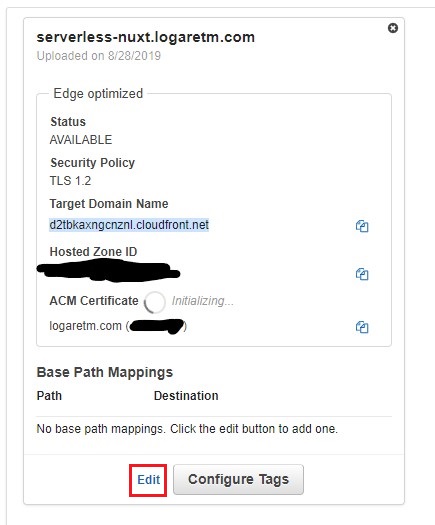
While it’s creating, edit the base mapping which will allow you to proxy different paths to your services, in our case we have only 1 root base mapping. So leave the path empty and select your serverless nuxt service, and make sure you selected the right staging environment, it should be dev if you are following along.
Almost there, the last step is that we need to add our target domain URL to our domain DNS records, I’m using Route53 to manage my domain so it should be like this:
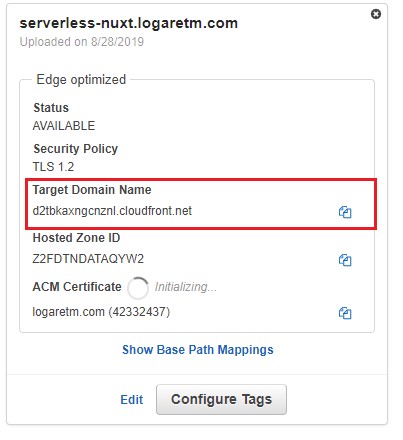
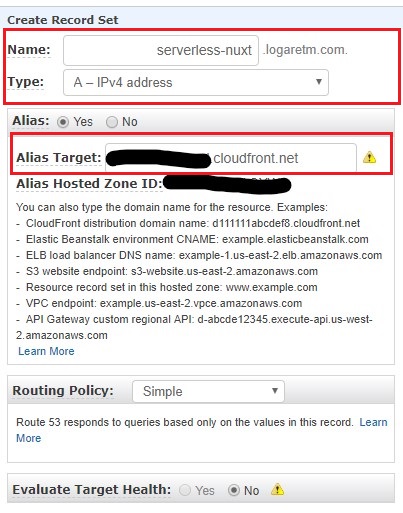
I’m adding an A Name using the alias option since all my stuff is managed on AWS. If you are using another provider for your DNS and domain settings then you should add a CNAME instead. Both the CNAME value should be the target domain we already copied in the last step.
Once it’s ready you could visit your custom domain, and voila you got yourself a Nuxt.js running on serverless. Also you got a full SSR rendering support which is great for your SEO!
In Production
We have been running some serverless services at Baianat, currently we are running 14 services 8 of which are web apps, and the rest are GraphQL APIs. So far this is the cost for a moderate traffic website for the last month:

For us the cost dropped to 80% compared to Dockerized deployment option. What is even better is that we no longer had to deal with DevOps of any kind.
Also because serverless framework is so well contained in an NPM package, creating CI/CD workflows is a breeze. You could easily run the same commands as above and your website will be deployed in a couple of minutes.
Notice that we did not break the monthly free tier.
That might be an indication of low traffic, but we also made sure to use PWA and caching to reduce 90% of those requests.
Bonus: CI/CD
To make deployments easier, lets add a custom script to our package.json scripts section:
json{
  "deploy": "yarn build && sls deploy"
}
This command is what we used before to build our assets and then deploy using the serverless CLI, that is why we installed it in the devDependencies.
Here is an example for a bitbucket-pipelines.yml that we use for some of those services:
yamlimage: node:10.13.0

pipelines:
  branches:
    master:
      - step:
          caches:
            - node
          script:
            # ensures we install Nuxt.js dev deps for building
            - yarn install --production=false
            # just an npm script for `sls deploy`
            - yarn deploy
Note that we are using node 10.13 because that’s the current LTS and is probably the one that will be running for our serverless nuxt app.
Caveats
There are some caveats that I did not mention as they require more familiarly with AWS, but I make note of one. If you get “timeout” errors then probably your page needs more time to render.
Go to your AWS lambda and locate your function and increase the timeout, the default is just 6 seconds.
Conclusion
The cost model for serverless is very cheap for low to mid workloads, making it a very good option for web apps.
Deploying Nuxt.js isn’t that special, we only needed to configure the lambda handler to properly serve binary files. There are much easier ways to deploy your Nuxt.js apps. But this one for me is the cheapest and most cost-effective option.
A word of advice though, make sure to keep tabs on your usage each month, watch the bills. The day might come where the model isn’t anymore suitable for your website.
You can find the source for the app here on GitHub.